Please enable JavaScript to view this site.
If you wish to Email your output then select the Email type from the list. The Email Output Device Properties are split into five tabs:

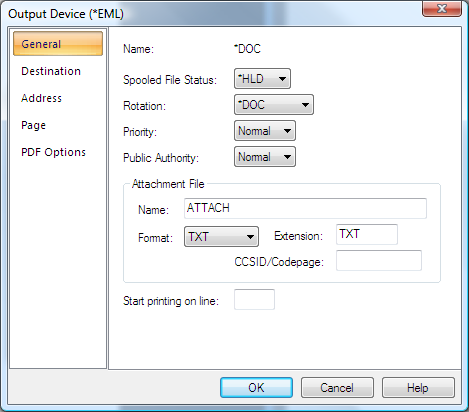
On the General tab you will see the following entries:-
Spooled File Status
This indicates the status of the input spooled file after it has been processed. The choices are to Hold the file (*HLD), Delete it (*DLT) or Save it (*SAV)
Rotation
You would normally leave this as *DOC as you should have set up the output orientation in the Page Set-up. If you wish to override this you may select either Portrait or Landscape.
Font Group
Leave the default as *DOC as this will have been defined in your Page Set-up.
Priority
This parameter allows you to set the priority of the generated email on the Cobwebb queue. You may wish to hold your emails whilst you are testing your design. (This parameter is only used if you have selected to “Enable email queue” in your Cobwebb Email system parameters.)
Public Authority
Again this relates to the email entry on the Cobwebb queue. The default of Normal is the suggested entry and then the authority depends upon how each user has been set up within Cobwebb Email. (This parameter is only used if you have selected to “Enable email queue” in your Cobwebb Email system parameters.)
Attachment File Name
Enter the name that you wish to be given to your attachment. This name must not be more than eight characters in length.
Attachment File Format
This is where you select the type of attachment you wish to create. Please see the topic File Formats for details. For XML output please select either SCS or TXT as this defines the format of the generated XML attachment.
Attachment Extension
This will change automatically depending upon which file format you choose. You may change this extension if you wish.
CCSID / Codepage
This entry affects the translation of the attachment and will be different for *SCS and *PDF.
Start printing on line
Not used.

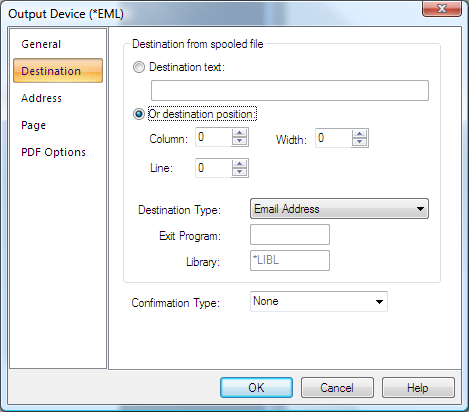
The Destination tab is where you decide how you are going to address your email.
Destination Text
This only used if you wish to hard code an email address.
Destination Position
This has been replaced by the Email Destination Address tool, which will complete these entries.
Destination Type
The default Destination type of Email Address is usually used, as you will have previously retrieved the Email Address either from the spooled file or by using an Exit Program.
Note: If you wish to remove the data you have selected to define your Email Destination, from the Output, select the relevant entry suffixed with (Delete).
The destination type of Directory entry is for retrieving email addresses from the Email directory within CPPD.
The other type of Exit Program allows you to call an Email Exit program to retrieve the email address parameters from a Server database.
Exit Program / Library
If you have specified Exit Program as your Destination Type then you need to specify the name of the Exit Program and the Library. The parameters may be passed into the Exit program using the Address tool to select data from the Output pane of your CPPD document. Please see Cobwebb Email Exit Program topic for more details.
Note: If you need to add more than one library to your library list, because the files used in the program reside in another library, then you will need to add them in your program.
Confirmation Type
This determines whether you wish to receive confirmation of your email having reached its destination. If you do not require confirmation then leave the entry of None or select the type of confirmation that you require.
Note: You must set up the confirmation Email parameters within the System Parameters on the Cobwebb Fax & Email menu in order to monitor for confirmation.

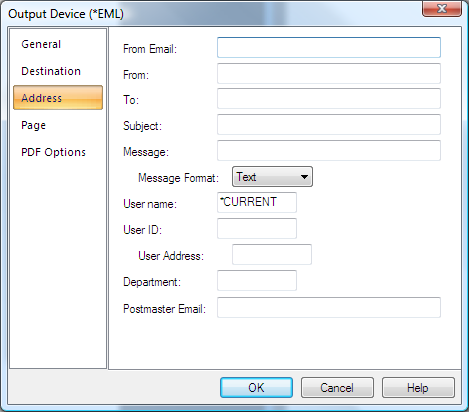
The Address tab is where you specify the addressing information for your email and has been largely replaced by the Address tool.
From Email
This is the From email address you wish to appear on your email.
From
This is the From email name you wish to appear on your email. From v6.2.87 - You may also use this entry, together with the Job Launcher, to schedule the release of your email by using the Date and Time variables (%D20221214%T104700) provided you set the Priority to Hold - see Release Scheduled Email for details.
To
This is the email address to which you wish to send your email.
Subject
This is the Subject you wish to appear on your email.
From v6.2.87 - You may also use this entry, together with the Job Launcher, to schedule the release of your email by using the Date and Time variables (%D20221214%T104700) provided you set the Priority to Hold - see Release Scheduled Email for details.
From v7.0.00 - You can add additional attachments to your email, such as terms and conditions. If you configure the path to these attachments in the Cobwebb General Directory by specifying '*ATTACH' in Key 1. You can then specify the value of Key 2 as a variable in the email Subject in the format %AKey2 (followed by a space) to retrieve these attachments i.e. entering 'Invoice 123456 %ATD01 ' will retrieve all entries from the General Directory where Key 1 = *ATTACH and Key 2 = TD01. You could add more than one attachment as it will read all records in the General Directory that match these Key 1 and Key 2 values, regardless of what is in Key 3. The General Data for each entry must be a valid path to a file on the IFS e.g. /cppd/tds/Terms_01.pdf otherwise the entry will be ignored and an error written to the joblog. Note: The %A variable must not contain spaces and will be removed from the Subject when the email is generated.
Each additional attachment is copied to the /cppd/email folder with a unique name (unless you have changed the data area EMLATTPTH to point to a different folder).
Message
The message text that you wish to send along with the email attachment.
From v6.2.84 - you can choose to use the XML Module to Import HTML and then use this to design your output and include this in the message body rather than adding it as an attachment. To then include the output in the message body you need to enter %ATTACHMENT (must be uppercase) in this Message entry. You may also use this functionality, without the XML Module, to output .TXT as the Message body; just specify TXT as the Attachment File Format on the General Settings.
From v6.0.30 - If you wish to include more than 1024 bytes of data in your Message text or to include carriage returns, then you may specify an HTML or TXT file to use as the message text. You do this by specifying a %FILE parameter in this Message entry e.g.
%FILE"/test/message.htm" where /test/message.htm is the path to the document you wish to use. Note the %FILE must be uppercase.
Note: If using %FILE then the file must always be encoded as UTF-8. Please see the topic Specifying File Paths for more information on how to configure the path to your file. You need to include the file extension e.g. .htm, .txt.
You can also include data from the spooled file in the message body - please see Create Dynamic HTML Email Message Body for details.
Message Format
The Message Format may be in Text or HTML. Please select from the drop down list provided.
User Name
The User name is usually left as *CURRENT, which will mean that the owner of the input spooled file will be the owner of the email on the Cobwebb queue. If you wish to change the owner of the email message on the Cobwebb queue then you may enter a specific user id here.
User ID & Address
The User Id and Address entries are only required if you wish for notification of the success or failure of your email to send. If you enter NFYAPI in the User Id, then a record will be written to the NFYMSGQ data queue. You can then monitor this data queue with your own Notify API program. If you wish for notification via SNADS of the failure of your generated email to reach its destination, the entry should be the SNADS User Id and Address of the person wishing to monitor the message queue.
Department
This is purely for enabling analysis of the Cobwebb queue if you wish to do so.
Postmaster Email
This should be the email address of the person monitoring your emails, as all error messages will be sent to this address.

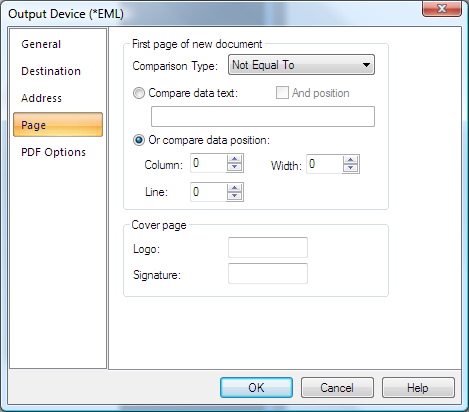
The Page tab is where you may set up the splitting up of your output pages into individual messages. If, for example, you are sending a Purchase Order print to a number of different Customers you would need to split the input spooled file into different messages, some may only be one page whilst others may be more. You need to select some data from your output pane, say Purchase Order Number, which appears on every page. You then need to select ‘Not equal to’ as the comparison type and on change of Purchase Order Number a new email entry will be generated. This has been replaced by the First Page Address Tool.
Please refer to Configuring Page Selection for a more detailed explanation.
Comparison Type
Displays the type of comparison operation required to distinguish the first page of a new document in the output file. The most commonly used entry is Not equal To as you would normally want to split up your documents when the area of the spooled file selected (using Compare data position) is not equal to that of the previous page e.g. Purchase Order Number.
Note: If you wish to remove the data written to the output to define your page selection then you need to use one of the entries with (Delete) on the end.
Compare data text
Displays the text string that is to be used in the comparison operation. Each page is scanned in turn for this text. Every page that this text is found on is considered the first page of a new document. If you only wish to check for this text in a particular position on the spooled then tick the And position box and enter Column, Line & Width. If you are using Compare data text then you would usually have the Comparison Type set to Equal To e.g. Page 1.
Compare data position
Displays the area from the output spool file that is to be used in the comparison operation.
This position is checked on each page. Whenever there is a difference between the text at this position, the page on which the change took place is considered the first page of a new document.
Cover page
If you wish to include a Cover page Logo or Signature then you may either enter *USRPRF to pick up the Cobwebb Email user defaults or enter the member name of the previously defined logo or signature within Cobwebb Email.
PDF Options
If you have selected PDF output you can specify certain options on the PDF Options tab.
See Also
